Register Your Domains Hassle-Free

Saturday 30 October 2010

Finding the URL of a picture stored in flickr

This article is about how to find the link (URL, web-address) of a photograph or picture that is stored in Flickr.

What is Flickr?

Flickr is one of many on-line photograph hosting services.   It is particularly attractive to bloggers because it includes collections of photographs that can be used without being subject to any copyright restrictions.


Getting the URL of a picture that is stored Flickr:

Option 1:   
Use a web browser (eg Firefox, Chrome) which has a "copy URL" or "copy shortcut) option in the right click menu.
  • Go to the photograph in a general window
  • Put the cursor over it, and click the right mouse button
  • Choose   "Copy Link Location", or "Copy shortcut URL" or similar

This puts the link to the photograph into your computer's memory, so you can go to another application and paste it.


Option 2:  
From flickR's photo-detail page, or if you are using aweb-browser (eg some versions / installations of Internet Explorer) without a copy-option in the right click menu:
  • Go to the page in Flickr that shows the details of the photo
  • Choose the Share This drop-down men
  • Choose Grab the Link, and copy the highlighed code


Related Articles: 


Inserting a picture into a blog post

Finding a picture's location in Picasa-web-albums

Taking action when someone has copied your blog without permission

Showing a PowerPoint presentation in your blog

Copyright, Blogs and Bloggers

Stopping pictures on your blog from being "clickable"

Friday 29 October 2010

Google Apps accounts

This article was written in October 2010, to support information about resolving conflicting Google and Google Apps accounts.

It is now replaced by Google Apps, Google Accounts and Blogger, which describes the situation now that the conflicting accounts have resolved and all Google Accounts have transitioned to Google's new infrastructure.

Tuesday 19 October 2010

Creating a button that links to your blog

This article is about how to make a button for your blog that other people can put on their blog or website.


Occasionally, someone may ask you to give them a "button" for you blog that they can put onto their own blog or website, instead of just using a boring linked-list or Blogroll entry.

Really, a button is just:

  • A picture and 
  • Some HTML code that says "show this picture, and when someone clicks on it, go to this website".


If someones needs to ask you for this (and not just your permission to use your logo), they probably don't have the skills to make the code and/or picture themselves.   So if you want to be helpful, and if you're interested in having them help to promote your blog  (and you probably are interested), you will need to do most of the work.


How to make a button for your blog:


1 Make or choose a picture to be your button.  

This could be your icon or title-image, if you have one, or any other image file that you own or that is not copyright to someone else. 

Make sure that it's saved as a fairly small size file, but still looks good on screen.   If you want to be particularly helpful, you could ask the other person what size of button they would like, and make you picture the same size.

You could use the Blogger icon as your button but:
  • It may not be the image your want to represent you, and 
  • The other person may be breaking Google's rules if you do - check the current roles at Google Permissions

2 Upload your picture to an image hosting service

Blogger stores photos in Picasa web albums, but you can use any file-hosting service.  Ideally it should be somewhere that will exist for as long as your blog exists.

If you are using Picasa-web-albums, make sure that the security of the folder where you've put it is either "Public on the web" or "Anyone with the link" - not "Private"

Make a note of the URL of the picture (not the album) after you've uploaded it.


3 The code to use is like this:

<a href="THE URL OF YOUR BLOG" imageanchor="1" >
<img border="0" src="THE URL OF YOUR IMAGE"  alt="Link to YOUR BLOG TITLE"/>
</a>

Or, if you would like the other website to stay open and your blog to open in a new tab or window:
<a href="THE URL OF YOUR BLOG" target="_blank" imageanchor="1" >
<img border="0" src="THE URL OF YOUR IMAGE"  alt="Link to YOUR BLOG TITLE"/>
</a>

To make this code work for your blog, you need to change:
  • THE URL OF YOUR BLOG
  • THE URL OF YOUR IMAGE
  • YOUR BLOG TITLE

to the correct values for your blog.


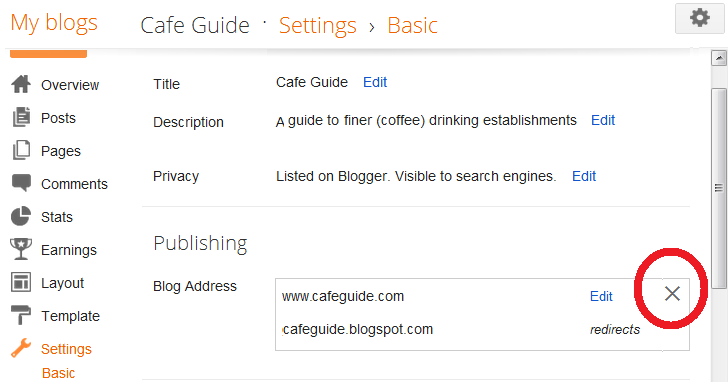
Installing your button


The method for installing your button on the other person's website depends on what tool they are using.  

If they are using Blogger, they have several options for installing third-party HTML (which is what you have made for them).

If they are using some other tool, they may need to consult the manual, or help forum, for that tool.


A warning about copyright

Copyright law applies to blogs, just like it applies to all created things.

If you make yourself a logo, then you own the copyright of that logo.   But if you make a copy of it available to someone else, then legally you may be implying that they are welcome to use it - details of this depend on the law in your country, and perhaps the laws in the country where you file-host is, and where Google is located too.

Notice that the method I have suggested gives you control over the image file that you've provided:  if you want to change the image later on, you can provided that the replacement gets exactly the same file location as the original file had.   (Google Sites file-stores currently do work this way, provided replacement files are makde by by uploading a file with the same name as the original had.)

If you use someone else's imagine as your button, make sure that either you have the owner's permission to use the picture, or that it is in the "public domain".


Related Articles:

Finding a picture's URL in Picasa-web-albums

File-hosting services

Putting 3rd party HTML into your blog

Copyright, blogs and bloggers

Linking your blog to the Social Networks.

Monday 18 October 2010

Using a custom domain for something other than your Blogger blog

This article is about how you can use a custom domain that was purchased through Google / Blogger for something other than a Blogger blog.


Blogger makes it very easy for you to buy a "custom" domain name (ie URL) for your blog.   Instead of being www.fred-fish.blogspot.com, you can easily be www.fred-fish.com - which is more appealing for all sorts of reasons.

Blogger tells you which domain registrar they're going to use and lets you change to the other one if you want to.  Apart from this, Google hides most of the "technical" domain registration details from you:  you are invited to set up a domain administrator account (in Google Apps), but even this is optional.  

But there may come a time when you want to use your domain for more than just a blog:  eg, Fred may want to use www.fred-fish.com to sell fishing trips or as the public gateway to a massive database of fishing achievements, neither of which are functions that Blogger (easily) provides.

To use a Google-Blogger purchased domain for something other than a Blogspot blig, you need to:
  • Move your blog away from the domain
    (you might move it use a subdomain or virtual host off the domain later on - but the first step is just to free up the domain for other use.
  • Change the domain-name-server settings for the domain to point to the right place for the "something else" that you want to use it for.

Even though you purchased the domain using Blogger, your access to it is through the Google Apps control panel: from there you get the login details for the domain registrar (currently either goDaddy or eNom that Google used to buy the domain).


How to re-use your domain:


Unlink the domain from your blog:


Log in to Blogger with the account that owns the domain.

2  From the Dashboard, choose:

In pre-Sept-2011 Blogger (ie the old interface)    Settings > Publishing > Switch to:  blogspot.com   
In post-Sept-2011 Blogger (ie the new interface)  Settings > Basic > Publishing and click the cross on the right of the Edit link beside your blog name.


This changes your blog back to www.YOUR-BLOG-NAME.blogspot.com, and removes the DNS records that pointed your blog to your custom-URL.

It may take a few hours (I've heard 72) for these changes to apply to computers all around the world, so people who go to your custom domain may still get re-directed to your blog for a day or two.

Also, Google (and other search engines) will still have indexed links to your blog contents at your custom domain.  These will gradually be replaced when
  • you put new content at your custom domain and 
  • it gets indexed by the search engines and 
  • the new content-indexing replaces data in the cached Google results in various computers around the world.
This can take some weeks, though, so your blog may miss out one some search traffic, and people who search for your new site may see odd results in their search list.


Next - link the domain to what you want it to show:


3  Find, or create, the domain administrator login details for your domain:

I've previously described how to set up the domain administrator for your domain.
  • If you haven't done this already, you need to find the relevant email and set up the account now.   
  • If you have done it, you need to remember the administrator login and password that you created.
  • If you cannot remember the administrator details, then go to  https://www.google.com/a/cpanel/YOUR-DOMAIN-NAME/ForgotAdminAccountInfo - put in the right value for your domain name, without www.  or http:// at the start.    Enter the captcha details, and if you have set up an administrator account the details will be emailed to your backup secondary address. 
  • If you never created an administrator account and cannot find the email to do it now, use this help-process.  Choose:
    - I never created an administrator account, then
    - I signed up at Google.com/a and purchased a domain name at the same time

    You can only use the help-process after you have un-linked your blog from the domain (ie steps 1-2 above plus left time for the change to be applied to Google's servers - somewhere between a few minutes and a few hours seems to work).  If you try to use it while your blog is still using the domain, you end up being directed back to Blogger.

    4  Go to https://www.google.com/a/YOUR-DOMAIN-NAME/

    5  Log in with the admin account and password from Step 3.

    6  Go to the Domain Settings tab

    7  Go to the Domain Names sub-tab

    8  Choose the Advanced DNS settings link.

    This opens a screen that shows you how to get into the DNS console for your domain.   It typically has
    • Your domain-registrar sign-in name and password,  
    • Your domain-registrar customer service PIN - in case you need to contact the registrar's customer services, 
    • Contact details for the domain registrar's customer service department  
    • A link that you can use to get to the to DNS console
    9  Log in to the DNS Console, using the details from step 9.

    10  Follow the directions there to make the domain changes.

    The steps required depend totally on what you are using the domain for:  for help with this, contact the the technical support forum (or whatever) for the product that's being used to build the new contents of your domain.


    If you need more help, check out the Google Apps help forum.


    Related Articles: 


    Automatically renewing your custom domain

    Transferring ownership of your blog to another Google account

    Blogger and other Google products - an overview

    How to change the credit or debit card that is used for custom domain purchases or renewals from Google

    This article about changing the default credit-card that is used for purchases that you make through Google Wallet (previously Checkout).  

    It is written for Blogger users who have purchased custom domains through Google, but the information applies to anyone who has made a purchase from Google Wallet, and wants to keep their details updated so they can be used again in future.


    Domain renewal and Google Wallet


    Previously, I've explained how to automatically renew a custom domain that was purchased via Googe/Blogger.

    Even if auto-renewal is turned on, you do need to check is that the credit card which will be used for the purchase is still valid:  because credit cards have an expiry date, the details may be incorrect even if the number has not changed.

    The credit card that will be used for the purchase is the one that is linked to the Google Wallet (previously Checkout) account which will pay for the domain.


    How to check and change credit-card number:

    Follow these steps:

    1  Go to Google Wallet:    https://wallet.google.com    (it used to be called Checkout, but is renamed)

    2  Make sure you are logged in using the Google Account that is being used to pay for the domain (or whatever other recurring transaction you are interested in).

    3  Click Payment Methods (now in the left hand bar)

    4  Check the credit card you want to use is listed, and is selected as the Default, and that the expiry date is correct.
    • Click on Edit to view the details.  
    • If you need to change any of them, make sure you enter the CVC and also press Save.

    To remove an existing credit card, just click the Delete link.

    You cannot edit the credit card number:  if your number has changed, you need to delete the existing credit card (with the Delete link), and set up a new one.   This will be frustrating if your address etc has not changed, but I'm fairly sure it's to do with the verification that Google carries out when cards are added.


    How to add a new credit card


    Click the red "Add a Credit or Debit Card" button at the top of the screen.


    Fill in the details in the fields .


    Initially, the "Make this my default payment method" is turned on:   leave it on if you want the card you are adding to be the one that is routinely used for purchases, or turn it off if you don't.


    Multiple credit cards and auto-renewals:

    I believe that domain auto-renewal transactions are processing using your current default credit card.

    However I haven't (yet) checked this at a time when had multiple cards attached to my account.  I will be checking this when my next domain renewal occurs, and will update this article if something else happens, eg if Google/Blogger gives an option on a per transaction basis if more that one credit card is listed.


    Related Articles:


    Automatically renewing custom domains purchased via Googe/Blogger

    Understanding Google accounts

    Setting up AdSense on your Blog

    AdSense and AdWords - understand the difference

    Setting up an administrator for your blog's custom domain.

    How to re-direct an old custom domain

    Friday 15 October 2010

    Copyright, Blogs and Bloggers

    This article presents a very short intoduction to issues of copyright, and how they apply to bloggers and their blogs.

    DISCLAIMER

    This article contains general advice about the copyright issues faced by people who use Blogger.   It cannot cover every possible case or specific legal systems.  If you need legal advice about particular issues, consult a lawyer, ideally one who is familiar with copyright law in your country and/or internationally.

    What does "Copyright" mean?


    In most countries, the law says that as soon as you create something (eg write an article, take a photograph, draw a picture, compose a tune, draw a map, make a slideshow), you own the "rights" to it for for a certain amount of time, usually until a number of years after you die.  And they exist just because you created the item:  there is no need to register it in any way.

    While the rights apply (ie the thing you created is still "under copyright") other people are not allowed make a copy of it - in any format - without your permission.  Once the rights have ended, the item becomes "public domain" and other people are free to make copies of it.

    If someone does make a copy without your permission, then they are breaking the law and legal action can be taken against them.   How this happens (criminal charge, private prosecution, etc) is different from country to country.  But breaking copyright is normally a "civil law" issue, local law-enforcement officials (police, etc) don't get involved, and it's up to you to prove that you owned the rights in the first place.


    Consequences for bloggers


    In short, what this means for people who righr blogs is that:
    • You "own" the stuff (words, pictures, videos layouts, etc) that you create
    • If other people copy it without your permission, they're breaking the law
    • If people copy your stuff, it's over to you to do something about it - if you want to.
      • If you copy other people's stuff without their permission, you are breaking the law.


      Another important point is that copyright only applies to specific works, not to ideas.  For example:
      • It's not ok for someone to make a direct copy of your picture, but generally they can make a similar photo themselves and use it
      • It's not ok for someone to copy-and-paste a recipe that you invented, but it is ok if they invent a very similar item and type up the recipe themselves.

      Of course this is a very broad statement.  There are detailed laws about Patents (the legal way of protecting ideas), about derived works (creations that are based on a work, but not quite the same as it), and fair use.   These laws vary between countries, so it is impossible to go into any more detail about them here.


      Next:


      Related Articles:


      Protecting your blog from being copied

      Taking action against unauthorised copies of your work

      Assessing an idea for a new Blog

      Removing the Attribution Gadget from your Blog

      Types of blogger template.