Register Your Domains Hassle-Free

Monday, 9 May 2011

Why RSS / Subscribe to Posts is important for your blog

This article explains why an RSS feed is important to bloggers, and some options for making it available.

Overview

Previously, I've described how to hide the Subscribe to Posts (atom) link that appears that the bottom of the screen on all Blogger's standard templates.

This is a sensible thing to do, because the link:
  • is ugly, 
  • is hard to find (except for hardened Blogger users who know what they're looking for), and 
  • uses words ("atom") that don't mean much to many readers, especially ones who don't use Blogger.
But providing an RSS feed for your blog is A Very Good Thing to do, and there are many ways of doing it which don't involve that link.


Why is an RSS feed a good thing?

When websites were invented, people found that it took a lot of time to visit all their favourite sites regularly just to check for any changes.   It was frustrating for sites that don't change often.  It was hard to spot changes in big sites.   And web-site owners realised that some people simply wouldn't remember to check back anyway.

A few approaches were created to solve this problem.  One is RSS ("really simple syndication"), which is based on the idea that
  • Websites are set up so that every time they are updated, they "publish a feed" of what's new, and
  • People who are interested in websites use "feed reader" software to check if the sites they are interested in have new material, and
  • Feed aggregator tools sit in the middle and keep track of what websites have published and what sites individual people are interested in what updates they have read so far.
Blogs that are made with Blogger are really just another type of website, so to work with RSS they needed a way to "publish a feed" of new material when posts are added.

The approach that Google originally used for Blogger involves "Atom" format.  The "Subscribe to Posts (atom)" link that appears on the bottom of most Layout and Designer templates is saying
 "Here's a link for your feed-reader to use, in our Atom format".
This works, but as I've said, it's ugly and not so obvious for non-Blogger-users.  The rules used to publish feeds on the internet have developed over time and different ways of organising the data in "feeds" (eg Atom 2.0, XML) have been adopted.  And website publishers have begun to look for more features in their feeds and in the statistics they get about who reads them.

Blogger also has a a Subscription-links gadget, which has buttons to let users subscribe to either your Posts or your Comments.  Recently I've had difficulty with this gadget:   I can add it, but it doesn't actually show up on my blog.   I've reported this via the Something-is-broken section of Blogger Help Forum, but not found a solution.


Alternatives:

cute picture of an anthropomorphic rabbit
The simplest alternative to the "Subscribe to posts (atom)" link is to make something else on your website that points to the same place as that link, but looks more obvious.
For example, you could use a cute picture of a rabbit, or even some text like "Follow this blog in RSS".

All you need to do is find the RSS feed address for your blog, and link it to this picture or text.

But although this gives your readers access to your feed, it does nothing for you.


A better alternative is to use a tool like Feedburner.


This takes your blog's "raw" feed and delivers it to subscribers in the format your specify - and also offers a number of other features including tools to
and many more.

Other alternatives?

There are other products that can be used to do similar things.

But Feedburner was purchased by Googe in 2007 (according to Wikipedia), so it's now part of the Google family of products.   Until I find some feature that I need but it doesn't have, I'm not likely to explore other tools, simply because it's often easier to use products from the same toolset.  

Your mileage may vary.  But if you're interested click here to find out about getting started with Feedburner.


Related Articles: 


Adding an RSS feed icon to your blog

Giving your blog an email subscription option, using Feedburner

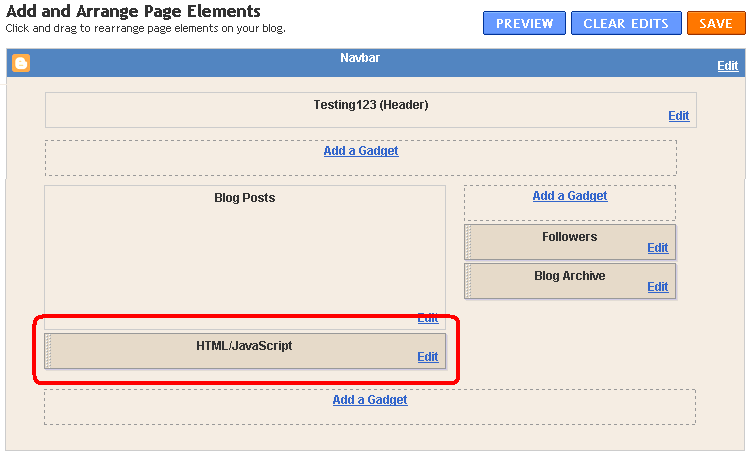
How to hide the Subscribe to Posts (atom) link

Finding the RSS feed address for your blog.

Blocking categories of AdSense ads from your blog

Sunday, 8 May 2011

Setting up Google Analytics for your blog

This article shows how to add Google Analytics to your blog.

Google Analytics and Blogger

Google Analytics is one option if you want more detailed statistics about your blog than you can get from Blogger's Stats tab.  It provides more features than most bloggers need, but it can be handy to use it from the beginning anyway, so that you have historical data when you do eventually want more detailed statistics.

It works by running a small script each time that a person views a screen from your blog:  this reads some information about the person, their computer and what content they looked at, and adds it to a statistical database that you (and Google) can get reports from.  It only collects data (number of visits, length of time spent, etc) from when the script is installed into your blog.  Initially you had to install the code yourself, but a change that Blogger made in October 2011 made this a lot easier.

Now, to install it into your blog, you simply have to:
  • Set up a profile for your blog in Analytics
  • If your blog uses Dynamic Views or has a Mobile template enabled (*)  (either all the time, or as an option):  put the Web Property ID you get assigned in Analytics into your blog's options, AND
  • Put the tracking code into your template, AND
  • Save the changes that you have made to your profile  (be careful - it's easy to forget this step!)

(*)  At the time of writing (15 Oct 2011) the help materials weren't 100% clear about the status of mobile templates.   My best guess is that you should install the Web-Property-ID anyway, just in case.   But I will update this article if I find any more information.


How to set up an Analytics profile:

1   Log in to Analytics, using the Google account that you want to do reporting from.    (If you're already logged in to Google when you go to that page, you may need to click the blue Access Analytics button).

This doesn't have to be the same account that owns or even has administrator rights to the blog that's being analysed - so long as you can figure out how to copy some code from Analytics into the blog.)   Personally, I keep my Analytics statistics in the same account that I use for AdSense and AdWords.


2   From the Analytics Settings tab, choose Add New Profile  (currently it's a link on the right hand side of the page)

3   Choose Add a Profile for a new domain  
(I'm assuming that anyone reading this article doesn't already have a profile to be extending.)


4   Enter the name of your blog (including the www at the beginning of the URL), and press Continue

In the next steps, you need to copy two different items from this screen.   So it's best if you leave this open, and switch to another screen to continue.


Putting the Web Property ID into your options:

5   Copy the Web-property-id from the top section of the screen:

6   Add ito your blog:

In Blogger-2011 (ie the new interface):

  • Go to Settings > Other
  • At the bottom of the screen, you will find a field for Google Analytics account number - paste the value you copied into this field
  • Click Save Settings at the top of the screen

(NB  If your screen is like mine, it will be hard to see the field - due to the "subtle" screen design that Blogger have chosen.   But it is there, and may show up better if you tilt your screen a little.)

In Blogger-pre-2011 (ie the old interface)

  • Go to Settings > Basic
  • Two thirds of the way down the screen, you will find a field for Google Analytics account number - paste the value you copied into this field
  • Click Save Settings at the bottom of the screen


How to add the Analytics code to your site

Analytics is used by many people running websites built with all sorts of tools, so the standard installation instructions are very general:
Copy the following code, then paste it onto every page you want to track immediately before the closing </head> tag

The Previous Instructions given by Analytics:
The detailed instructions link in Analytics leads to the appropriate section in the Analytics help-centre.  At one stage, this had a link to Blogger-specific instructions, but this seems to be gone.   But I'm pretty sure that it said to find the  <body> tag and paste the code from Analytics immediately after it.   This still works, but it's harder to describe now, because some templates put other content in the body statement, and you need to locate the place after the angle-bracket ">" that closes the <body statement.

Searching the help-centre for "blogger" shows various articles, including some that tell you to put the code into your template just before the closing </head> statement.    Some of these remind you to download a full copy of your template before making changes to it - and none of them warn you about the disadvantages of editing your template.


Another Alternative:
An alternative suggested by Google engineers in some places is to install the tracking code into a HTML/Javascript gadget - this is Option 1 in ways to install 3rd party HTML into your blog.

A major advantage of this approach is that your statistics won't be interrupted if you change templates:  remember that changing templates keeps your gadgets (though it sometimes moves them around), but deletes any template changes that you have made.

You do need to decide where to put the gadget:  it doesn't actually show anything on the screen (except perhaps a small space that looks blank to your readers), but visitors to your will be "counted" when the gadget runs:  if your blog page takes a long time to load, and your gadget is in the footer, then visitors who don't wait for the entire page to load before clicking away won't be counted.  Personally, I like to put the gadget immediately under the Blog Posts gadget, like this:

Blogger Page Elements design screen, with area under the Blog Posts gadget highlighted

IMPORTANT:  Don't forget to press the orange Save button after your have shifted the gadget to where you want it to go.


After the code is installed, it takes a little time (maybe even 24 hours) for tracking to start.   Once it's started, you can get reports by selecting the profile from the View Reports drop-down in the Analytics application.


Related Articles: 


Advantanges and disadvantages of editing your template.

Planning changes to your blog's template

Advertising on your Blog:  some things to consider

How the data in Blogger is organised

Blogs, bloggers and Blogger, Post, Pages and Screens - some basic concepts

AdSense and AdWords - understanding the difference

Friday, 6 May 2011

Installing code into your blog

This article is about how to install code into your blog.

Why you might want to install code:

Javascript Code example There are plenty of websites suggesting to tweak your blog.  A few these tell you how to use standard Blogger tools, but many have written code that does something useful that Blogger doesn't currently provide.

Also, there are lots of tutorials about how to do things with HTML, CSS or Javascript - no matter what "development environment" (Blogger, Dreamweaver, etc) you're working in.     For example, I recently wanted to put tables with scroll-bars into the posts of one site, and, after a bit of googling found a method that works across all the common browsers.  (Well it worked when I tested it first - sadly it wasn't working in Chrome when I finally finished loading the content, but that's another story!).

I'm generally wary about installing things from 3rd parties.  But there are times when it's a good thing to do because the benefits for your blog outweigh the risks - for example, I'm happy to install code from AdSense, Amazon Associates, Chitika, PayPal and various other well known brands.


How to install code:

Two previous articles describe how to install 3rd party HTML into your blog, and how to add CSS to your blog.

The only other type of code that you can add is Javascript.  To add this:

1  Edit your template, in the usual way.

2  Find the </head> statement

3  Put the code immediately before </head>, using this format:
<script type='text/javascript'>
//<![CDATA[

THE CODE GOES HERE


//]]>
</script>

4  Click the Preview button, to check that the blog loads and looks ok.

5  If it's not ok,choose Clear Edits and try again:  check you are putting the code in the right place.

6  Once you're happy, Save the changes.


Related Articles: 


Adding HTML into your blog,

Installing extra CSS rules into your blog.

Planning changes to your blog - in private

Showing Presentations in your blog

Is code from a 3rd party safe to install on my blog?   (coming soon)

Giving your blog an attribution (ie credits) gadget

This article is about giving your blog an attribution gadget, either one of Blogger's standard ones, or one that you make yourself.

Blogger's standard attribution gadget


If your blog has a Designer template (ref What sort of template do I have?) then by default it will have an attribution gadget at the bottom of the footer.

Previously, I've described the concerns that many people have with the attribution, and how to delete it.

However some people may want to add a standard gadget back in again, and others would like to make a customised version of the gadget that gives credit where it's due.


Adding a standard Attribution Gadget


The attribution gadget is not available through the usual Add a Gadget option.

The only way to get it onto your blog is to apply one of the Designer templates.

To do with with the old (ie pre-Sept-2011) Blogger:
  • If you have a Layout template, use Design > Template Designer and pick one of the new options
  • If you have a Custom template, use Template > Customize Design > Upgrade your template
  • If you already have a Designer template, use Design > Template Designer and choose another one.   (And maybe use the same command again to change back to the template you had previously, if that's what you want to do.)


To do with with the new (ie post-Sept-2011) Blogger:
  • If you have a Layout or Designer template, use the Template tab , hover over one of  the new options and click either Appy to blog or Customize 
  • If you have a Custom template, use Template > Customize Design > Upgrade your template


Remember:  changing templates undoes all the customisations you have previously applied through the Edit HTML tab.  Plan your template change carefully.


Building an alternative Attribution Gadget

The only way to customize the standard attribution gadget is to add some text to the Copyright field.  This text is show an the beginning of the standard statement.

But many people want to change the other items too, for example to credit Tina Chen for the underlying template AND themselves for the colour scheme and layout.  This can be done by changing the template-name in your template.  If you want to more than just change the existing names, your options include:


1  a Blogger icon
Add a Blogger icon gadget to your template:  and choose one which you like.


2  A picture
Design a graphic that gives the appropriate credits, and add it to your blog  as a picture gadget


3  A Text Gadget
Add a text gadget, and put phrase(s) like these in it.
"Template created by WHOEVER, modified by YOUR NAME." 
"Photos by YOU (OR WHOEVER).   Page background image by WHOEVER"
"Powered by Google: site design by Blogger, file-hosting by Google-Sites"
"© YOU. You may copy and adapt this document for non-commercial use provided this notice is not reblog moved.
This work is licensed under the Creative Commons Attribution-Noncommercial-Share Alike 3.0 Unported License. To view a copy of this license, visit http://creativecommons.org/licenses/by-nc-sa/3.0/ or send a letter to Creative Commons, 171 Second Street, Suite 300, San Francisco, California, 94105, USA."

Think carefully about where to put the attribution, and how to format it:  not many web-design or hosting companies expect their clients to devote prime screen-space to acknowledgements for the web-host - but you may want to advertise your own services ("customised by YOU").


Note:   at the moment, these methods only work on non-mobile template blog views.


Related Articles: 


Changing the template-name in your template

Deleting the attribution gadget

Removing the attribution gadget from your mobile-template.

Planning your template change - seven simple steps to a snazzy new look blog

Adding a gadget to your blog

Thursday, 5 May 2011

Getting started with Feedburner

This article is about how to set up Feedburner to produce a feed from a blog.  It is targetted at Blogger users, but most of the information applies to other types of blogs and webpages too.

Overview


Previously I've explained why an RSS feed is important to bloggers,

Feedburner is one option for addressing the limitations of Blogger's "native" feeds.

And although it's owned by Google now, it was originally a different company so isn't quite the same as good to set up.   


That said, getting started with Feedburner is actually very simple. You just:
  • "burn" (ie create) a feed from your blog (or other website), 
  • put something in your website that lets your visitors choose to subscribe to your feed.

This article is about the first step, creating the feed.


Burning a Feed in Feedburner


Follow these steps:

1  Go to Feedburner:  http://www.feedburner.com/

2  Log in, using the same Google account that owns your blog.

Feedburner doesn't enforce this:  you can burn feeds for websites, blogs etc that you don't own.   But if you are interested in managing the rights of your blog overall, and in particular if you may want to give it to someone else to manage, it's very helpful if the same account owns all the components in your blog.


NOTE:  if you have added the Follow-by-email gadget to your blog, then you will already have created a feedburner "feed" for it.    You can find out if there is one by looking on the screen that's shown when you log in to Feedburner.   If you do have a feed then you may want to continue using it, rather than set up a new one.


3  Enter your blog's URL in the "Burn a feed right this instant" field

4  Press Next

5  Choose a feed source:

Because Blogger's current standard is to provide two feeds for each blog (one in Atom format, one in RSS format), Feedburner will show you a message saying "Feedburner discovered more than one feed at that address", and asking you which one you want to use.


Currently, I don't know any advantages of using either one, so I generally leave it on the default (ie first) option.

6  On the next screen, you can change the suggested values for the the feed's title and part of it's URL.  
  • The title is the name that the feed will be known as in your Feedburner account.
    It's possible to burn more than one feed from the same blog, if you want different features on different feeds.  If you're going to do this, make sure you use names that are meaningful to you.
  • The URL is the one that feed-subscribers need to enter into their feed-reader-software to subscribe to your feed:  this isn't normally seen by human-beings so doesn't need to be meaningful - Feedburner generally makes it a "tiny-URL" style of abbreviation.


7  Feedburner then creates your new feed, and shows you a congratulations message.

This message includes the name of the feed.  Theoretically you could share this with your audience, but I've noticed that sometimes it has extra spaces it in.   It's far better to wait and use the tools from the Publicize tab to share your feed with your viewers.

8  You are given the option of adding some extra free statistics:  I generally turn these on because they're free and I haven't found any reason not to have them.  

(You could turn them off if you viewers complain that your feed is slow to work with, but it doesn't usually seem to happen.)


Next steps


Just creating a feed from Feedburner isn't actually very useful - your blog was already publishing feeds anyway.  The benefits come from using Feedburners tools to promote, manage and monitor use of your feed.   You can access these from the main Feedburner screen, which is where you are taken after your feed is made.  The options are grouped into the Optimize, Publicize, Moneytize and Troubleshootize tabs.   

Feedburner sometimes shows some "cute" phrases on the screen, and uses quirky words to describe things, eg "troubleshootize".   This is because the product was originally totally separate from Google and the company developed its own way of doing things.  When Google took over, some things become more standard, but this wasn't one of them.

There are lots of things you can do with your feed.  But the first and most important steps are:


Related Articles:


Components in your blog

Why an RSS feed is important to bloggers

The Follow-by-email gadget:  an easy way to make a feed from your blog

Making your Feedburner feed available on your blog

Making an email-subscription available on your blog

Providing social proof, by enabling the Feedcount button

Understanding Google accounts

Tools for applying copyright protection to your blog

Putting a Facebook "Share this" badge on your blog.

Posts, Pages and navigating inside your blog

This article explains Posts, Pages, and some ways that they can be used to help people move around inside your blog.

Overview:
Since Google introduced the new Pages feature, there has been a lot of confusion about Posts, Pages, Sub-pages, and how to categorise things.

This isn't helped by a lot of Blogger's own documentation, written before the Pages feature was introduced, which used the term "pages" to refer to a collection of Posts.

This article explains the difference, and looks at when each type of item should be used.


Pages vs Posts

A Post is the basic unit of information that you publish in Blogger.  Each post has a post-date, and this date is often the main tool for navigating around your blog.

On the surface, a Page is similar to a Post.  But really, they are quite different, and should be used for different things.

Pages are meant for static content that doesn't change often.  This is content that supports your main content, which is in your posts.   Because of this, Pages:
  • Cannot be set as your home page
  • Cannot be navigated to from the Newer/Older posts links
  • Don't have labels
  • Can only be navigated to from the Pages gadget - cannot be navigated to from the Labels gadget
  • Are not included in RSS feeds
  • Are not included when you export your blog contents,
Ideally, you should only edit your Pages very rarely.


Navigating around a Blog

When the Pages gadget is displayed as a horizontal bar, it looks like a menu bar.


This makes many people think that Pages are the main way of navigating around a Blog.  This wasn't true, initially, but recent changes to the Pages gadget have made it more helpful.   That said it's not the only - or best, IMHO - way to get your users navigate.

The tools that Blogger provides for navigating around a blog are:
  • The Labels gadget (to list posts by category) - you can use it to make it seem like you have put your posts into "pages"
  • The Archives gadget (to go directly to a post by date)
  • The Newer/Older posts links (to go through the blog one screen at a time)
The Linked List gadget can also be used for navigation, provided you set it up with links to Posts in your blog.  

And you can put links between individual Posts using regular hyperlinks (select the text, cick the Link item in the toolbar, put in the URL of the post that you are linking to).

The Pages gadget is not intended for navigating through most of the contents your blog - it is only useful for getting directly to reference information that isn't stored in the same sequence that your main blog contents are.


Related Articles: 


Blogs, Blogger, blogger, Post, Pages and  Labels - some basic definitions

The difference between Posts and Pages

Why Blogger's "static" pages are more trouble than they're worth

Categorising Items in your Blog

Putting your posts into "pages"

Jump Breaks and Posts

Wednesday, 4 May 2011

Adding a separator line between your posts

This article shows how to put a horizontal separator line between posts in your blog, using either HTML's line command, or CSS rules.  It also has suggestions about ways of formatting these lines using different colours and line-styles.


There are at least four approaches to choose from if you want to put a divider between your posts in Blogger.  These days, I prefer the CSS-rule approach, because it's so easy and flexible.  But I've shown details of a few other methods too:
  • Manually add a horizontal line command to each post
  • Use the post-footer colour block as a line (in Designer templates only)
  • Add the HTML command for a line to the main section of your template, in one of the post-footers
  • Add a top or bottom-border to the CSS rule that formats the body of your posts.
The following sections give more detail about each option, including how to apply them to your blog, and their advantages and disadvantages.


Manually add a line to each post

When you are editing a post, you can put a horizontal line anywhere in the contents.

If Compose Settings (under Post Options) is set to  Interpret typed HTML, then you can just type <hr />, and Blogger will place a line like this in your post.


If your Compose Settings (under Post Options) is set to  Show HTML literally, then you need to switch to the Edit HTML tab before you type <hr />.

Disadvantage: If your post is set to display comments, or the blog is set to show the author, labels etc under the post, these items will be underneath any line that you add manually to a post.


Designer Template - post footer colour

If your blog has a designer template (ref, What sort of template have I got), then the Template Designer > Advanced tab may have an option for setting the background colour of the post-footer (depending on which template you are using).


If you use a dark colour (or have a dark background and use a light color), this makes the post-footer look like a line.

Disadvantage:  The "line" might be a bit thicker than you like.   And if your post is set to display comments, or the blog is set to show the author, labels etc under the post, these items are shown right inside the footer line.


Add a line-command to your template

If you don't like the other two approaches, you can change your template to add a horizontal line.  To do this:

1  Edit your template:

In Sept-2011-Blogger (ie the new interface) go to Template > Edit HTML > Proceed
In pre-Sept-2011-Blogger (ie the old interface) go to Design > Edit HTML.

Download a full copy of your template, and put it somewhere safe (in case things go wrong, and you need to go back to where you were).

3  Click on Expand Widget Templates.

4  Most templates have three footer lines:  what is in each one depends on the template, and how you have arranged the items in the Layout > Blog Posts editor.

Look at the template for code like the following,
       <div class='post-footer-line post-footer-line-2'><span class='post-labels'>
        <b:if cond='data:post.labels'>
          <data:postLabelsLabel/>
          <b:loop values='data:post.labels' var='label'>
            <a expr:href='data:label.url' rel='tag'><data:label.name/></a><b:if cond='data:label.isLast != &quot;true&quot;'>,</b:if>
          </b:loop>
        </b:if>
      </span> </div>
OR
 <div class='post-footer-line post-footer-line-3'/>
    </div>

and add the <hr /> command to which ever one you want, for example
 <div class='post-footer-line post-footer-line-3'/>
<hr />

    </div>

Advantage:  you can easily place the divider line anywhere you want it, relative to the other items in your post-footer.


Disadvantage:  you need to modify your template, and this does have some risks.  And it does use the <hr /> tag which some people (CSS purists) suggest is not a good idea.


Enhancements to the basic <hr /> command:


There are lots of ways you can modify the <hr / > code.   For example

<hr style="text-align: left;" /> -  to left-align it

<hr style="color: red;" /> -  to change the colour
<hr style="width: 50%;" /> -  to make it narrower

See w3c.schools <hr /> tag for more information. 


Add a border to the CSS rule that formats your posts

The cascading-style-sheet rules in your template control most aspects of how your blog looks.   They can be a very powerful way to control how your blog looks.

Quick option:

If you have a designer template, then the quick way to make this change is to add a CSS rule to your template.  The rule code to add is:
.post-body
{
border-bottom:1px dotted #666666;
}

or this one if you want the border at the top of each post:
.post-body
{
border-top:1px dotted #666666;
}

In-depth

The specific CSS rule that controls how the "body" of your posts look is .post-body.   To make changes to it:

1 Go to Design > Edit HTML

2 Download a full copy of your template, and put it somewhere safe (in case things go wrong, and you need to go back to where you were).

3 Look for .post-body in the rules section of your template. It will look something like this, but  the exact lines and values may be different:
.post-body {
margin-top: 0;
margin-$endSide: 2px;
margin-bottom: 0;
margin-$startSide: 3px;
}
 4  If you can find a .post-body rule, then add this line, just before the } character.
border-bottom:1px dotted #666666;
5    If you cannot find a  .post-body statement in the rules section of your template, then you need to add it.

Put it somewhere:
After    <b:skin><![CDATA[/*

Before  ]]></b:skin>

But not in the middle of any other rules: look at how the rest of that section of your template is laid out for clues.

The statement to add is something like the following, though you may want to try out different values for parts of it.:
.post-body {
border-bottom:1px dotted #666666;
margin-top: 0;
margin-$endSide: 2px;
margin-bottom: 0;
margin-$startSide: 3px;
padding-top:10px;
margin-top:20px;
}


Alternative formats:

The #666666 means draw the line in black - you may like to use a different colour, or use the word "solid" instead of "dotted" to make a firmer looking line.

As an alternative, you can say border-top:1px dotted #666666; - this puts a line at the top of the body of each post, just underneath the title.


Related Articles:


What sort of template have I got

Disadvantages of editing your blog's template.

Adding a new CSS rules to your template

Centering the Post-title or Page-title

Putting HTML from elsewhere into your blog.